
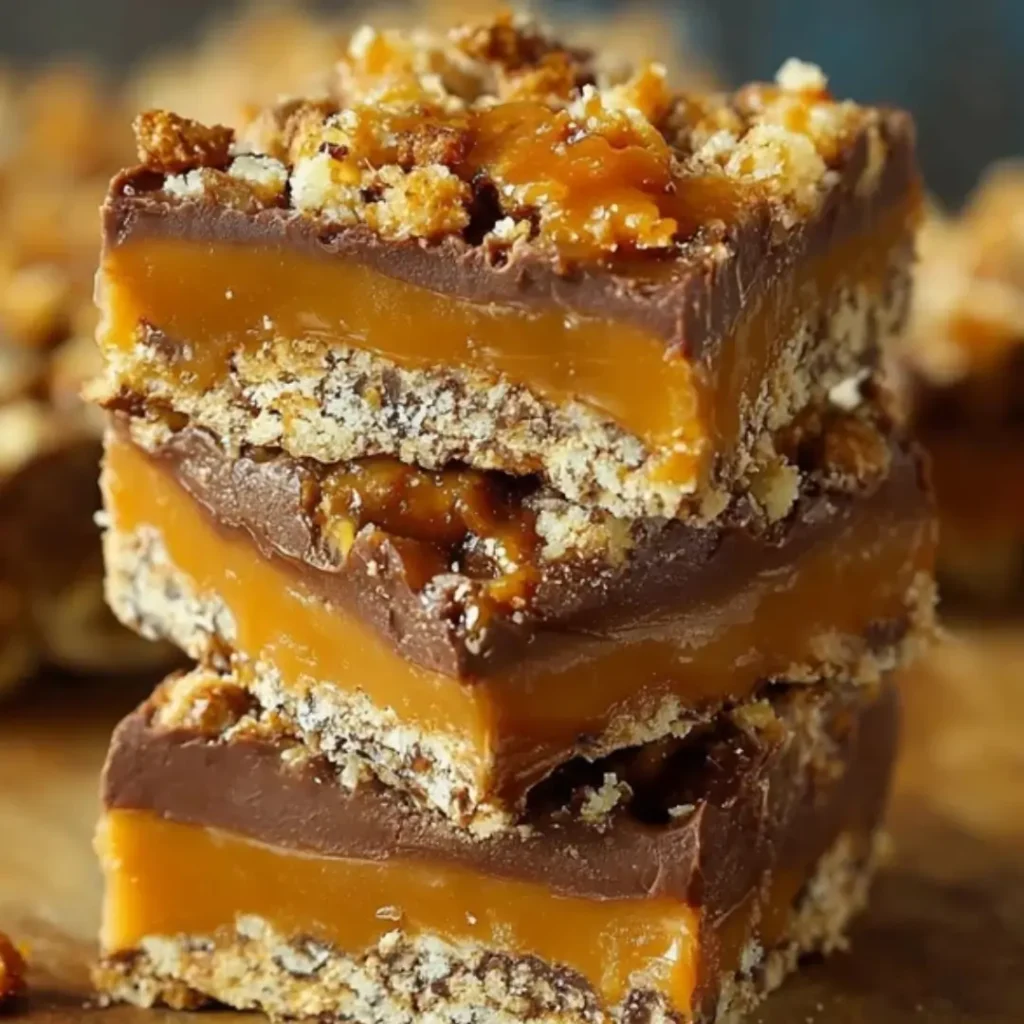
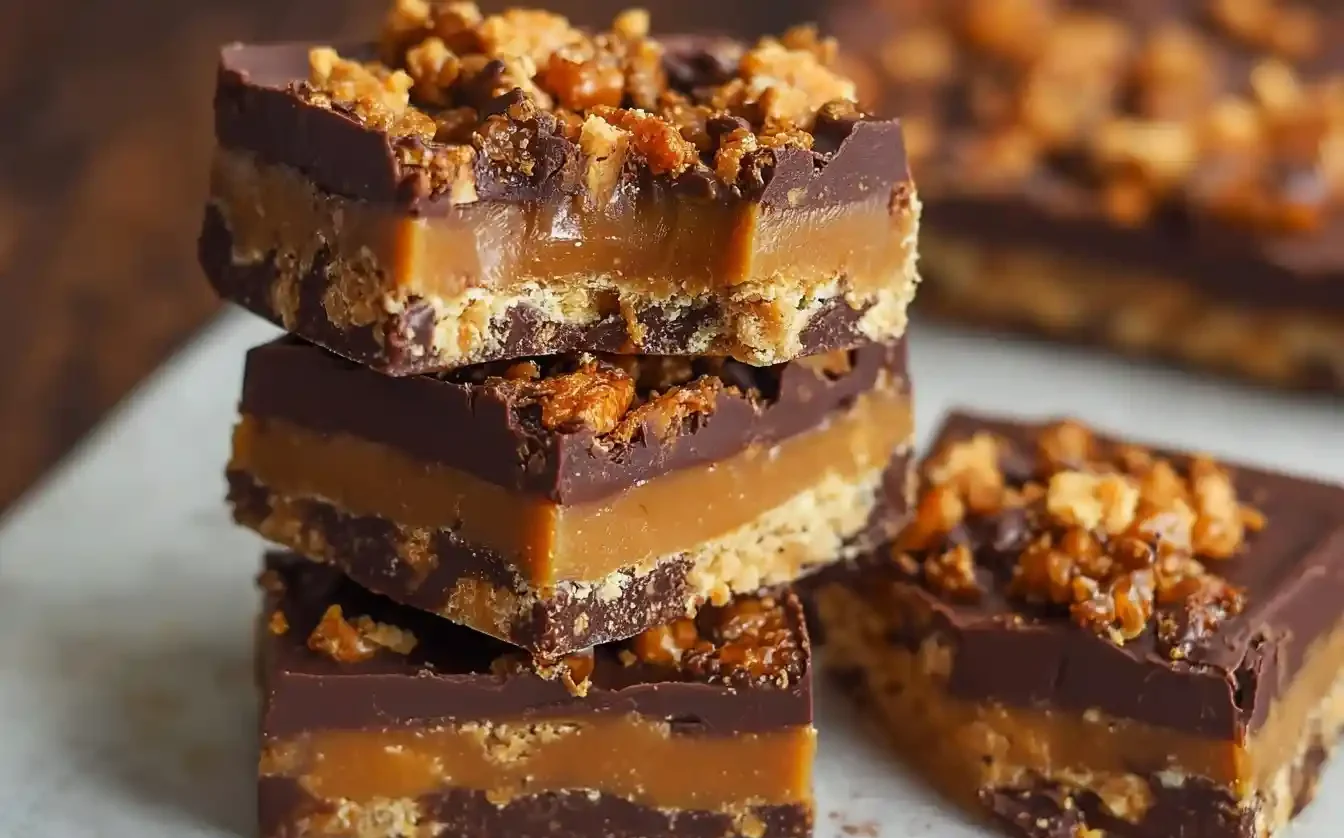
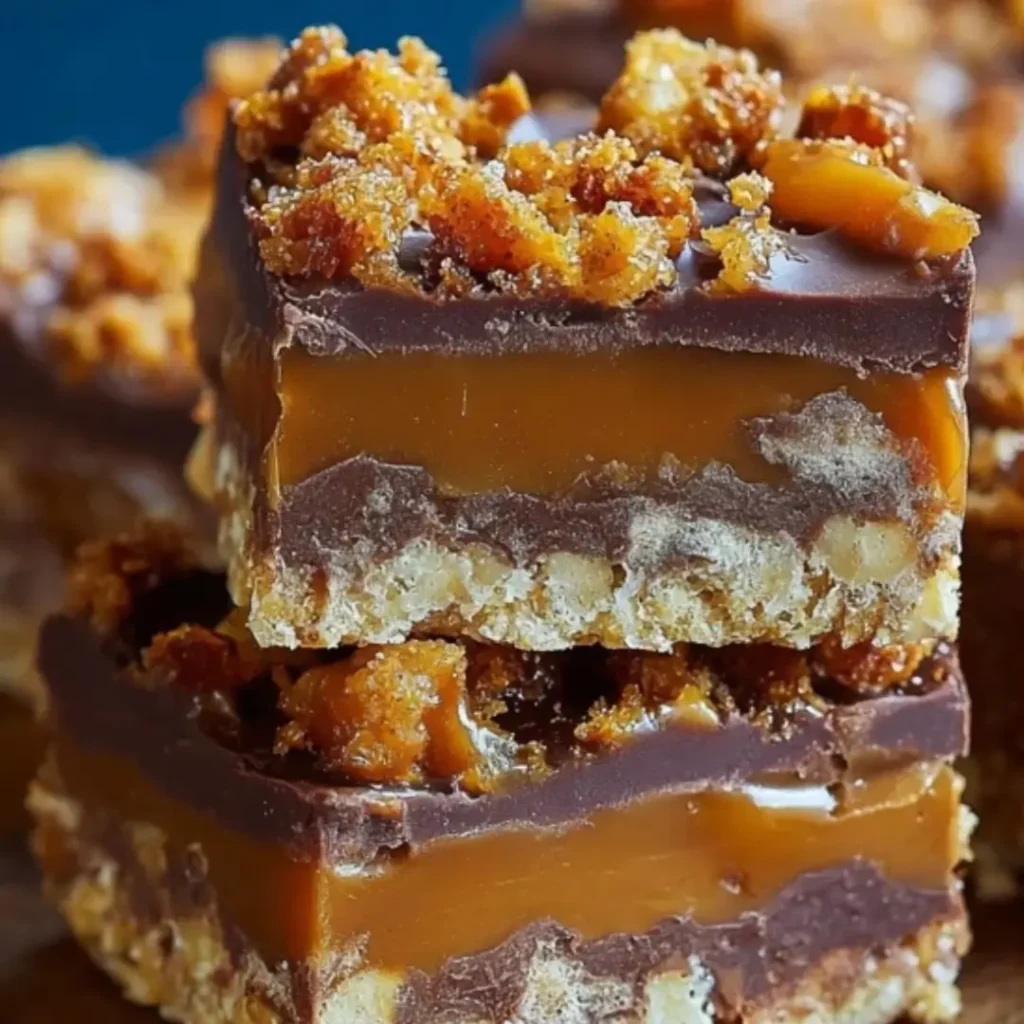
Oh, friends, there’s just something truly magical about a dessert that brings a little sparkle to everyday moments, isn’t there? Today, I’m absolutely delighted to share a recipe for butterfinger caramel crunch bars – a treat that perfectly blends crunchy, chewy, and utterly decadent. Imagine the sweet, buttery shortbread, the rich, gooey caramel, and that unmistakable Butterfinger crunch, all coming together in one irresistible bite. It’s the kind of dessert that makes you close your eyes and savor every single flavor.
I remember childhood afternoons spent in my grandmother’s kitchen, the scent of vanilla and warm butter always in the air. She’d always say, “Sara, a little love makes every treat taste sweeter.” It’s a philosophy I’ve carried with me, through years of experimenting with flour-dusted triumphs and a few charming kitchen mishaps, leading me to create recipes that are not just delicious but also filled with that heartfelt, homemade charm.
These butterfinger caramel crunch bars are a testament to that philosophy, offering a delightful combination of textures and flavors that are surprisingly simple to achieve. They’re wonderfully easy to bake (and mostly no-bake!), making them perfect for busy weeknights or a special gathering, and a true family favorite. My top tip? Always taste your caramel as you go – it’s part of the baking adventure!
What You Need to Make This Recipe
Crafting these delightful no-bake bars relies on a few key ingredients that truly shine. We’re talking about rich unsalted butter for that tender shortbread crust, sweet granulated sugar for perfect balance, and creamy heavy cream that makes our luscious caramel layer irresistible. I always believe that high-quality ingredients, like a good vanilla extract, make all the difference, transforming simple components into something extraordinary. These butterfinger caramel crunch bars are proof that a little care in ingredient selection goes a long way. You’ll find the full list of ingredients and precise measurements in the recipe card below, ready for your sweet adventure!
How to Make butterfinger caramel crunch bars
Creating these delectable butterfinger caramel crunch bars is a straightforward and joyful process, much like those comforting recipes from my grandmother’s cookbook. You’ll begin by pressing a simple, buttery shortbread crust into place, a delightful foundation for what’s to come. Next, a rich and velvety caramel layer is crafted on the stovetop, infusing that familiar warmth into the bars. Finally, it’s all brought together with a generous sprinkling of crushed Butterfinger candy and a decadent chocolate topping, then chilled to perfection. It’s truly a no-fuss recipe that promises a big payoff!
Butterfinger Caramel Crunch Bars
Ingredients
Equipment
Method
- Preheat your oven to 350°F (175°C). Line a 9x13 inch baking pan with parchment paper, leaving an overhang on the sides to easily lift the bars out later. Lightly grease the parchment paper if desired.
- In a large mixing bowl, cream together the softened butter and granulated sugar until light and fluffy. Gradually add the all-purpose flour and salt, mixing until a soft dough forms.
- Press the dough evenly into the bottom of the prepared baking pan. Bake for 20-25 minutes, or until the edges are lightly golden. Remove from oven and let cool slightly on a wire rack while you prepare the caramel.
- In a heavy-bottomed saucepan, combine the granulated sugar and water. Cook over medium heat, stirring gently until the sugar dissolves. Once dissolved, stop stirring and let the mixture boil until it turns a rich amber color. This can take 8-12 minutes. Watch carefully to prevent burning.
- Carefully and slowly whisk in the warmed heavy cream and then the pieces of room temperature butter. Be cautious as the mixture will bubble up vigorously. Continue to cook over medium-low heat, stirring constantly, until the caramel reaches 240°F (115°C) on a candy thermometer (soft ball stage). If you don't have a thermometer, drop a small amount into cold water; it should form a soft, pliable ball.
- Remove the caramel from the heat and stir in the vanilla extract and optional sea salt.
- Pour the warm caramel evenly over the slightly cooled shortbread crust.
- While the caramel is still soft, generously sprinkle the crushed Butterfinger candy bar pieces over the entire surface.
- In a microwave-safe bowl, melt the milk chocolate chips with the vegetable or coconut oil in 30-second intervals, stirring until smooth. Alternatively, melt in a double boiler.
- Pour the melted chocolate over the Butterfinger pieces, gently spreading it evenly with a spatula to cover the topping.
- Place the pan in the refrigerator for at least 2-3 hours, or until the chocolate and caramel are completely set. This is crucial for clean cuts.
- Once firm, use the parchment paper overhang to lift the entire slab of bars out of the pan. Place on a cutting board and use a sharp, warm knife (run under hot water and wipe dry between cuts) to cut into 16 or 24 bars.
- Serve and enjoy!
Notes
Pro Tips for Making This butterfinger caramel crunch bars
Achieving that perfect balance of crunch and chew in your butterfinger caramel crunch bars is easier than you think with a few of my tried-and-true tricks. These are the little secrets I’ve gathered over years of baking, turning simple steps into sweet successes!
My Secret Trick: When crushing your Butterfinger candy bars, don’t overdo it! I find that leaving a mix of finer crumbs and slightly larger chunks gives the best textural contrast, ensuring every bite has that satisfying, authentic Butterfinger crunch. It makes all the difference!
I always recommend letting your caramel come to temperature slowly, especially when adding the heavy cream and butter. Rushing this step can cause it to seize or separate, and we want that silky, smooth texture for our butterfinger caramel crunch bars. Patience truly is a virtue in the kitchen, and it results in a much more luscious caramel.
For the chocolate topping, I find that a little vegetable oil mixed with milk chocolate chips creates a beautifully smooth and easy-to-spread ganache-like layer. It sets up perfectly without becoming brittle, ensuring those top-most butterfinger caramel crunch bars slices are always a dream to cut through.
When assembling, ensure your shortbread crust is thoroughly chilled before pouring on the warm caramel. This helps prevent the caramel from seeping into the crust and keeps your layers distinct and picture-perfect. A little pre-planning ensures a much cleaner, more appealing bar.
Fun Variations for butterfinger caramel crunch bars
Baking is all about creativity and making a recipe truly your own, and these butterfinger caramel crunch bars are wonderfully versatile! Here are a few ways to add your unique touch or cater to different tastes, inspired by friends and family.
Nutty Twists
My friend, Sarah, absolutely adores a nutty crunch! For an extra layer of flavor and texture, try adding a sprinkle of chopped toasted peanuts or pecans to the caramel layer before the Butterfinger bits. It complements the existing flavors beautifully and adds a delightful depth.
Chocolatey Swap
If you’re a dark chocolate aficionado, consider swapping out the milk chocolate chips for a good quality dark chocolate in the topping. The slight bitterness of dark chocolate provides a wonderful counterpoint to the sweetness of the caramel and Butterfinger, creating a more sophisticated butterfinger caramel crunch bars experience.
Seasonal Flair
For a festive touch, especially around the holidays, you could swirl a tiny bit of peanut butter into the caramel just before pouring, or even add a sprinkle of holiday-themed sprinkles to the top chocolate layer before it sets. My niece loves when I do this for her birthday!
What to Serve With butterfinger caramel crunch bars
These decadent butterfinger caramel crunch bars are so satisfying on their own, but pairing them with the right accompaniment can truly elevate the experience! I love thinking about how to make a dessert feel like a complete, comforting moment.
I often find that a simple scoop of good quality vanilla bean ice cream is the perfect partner for these bars. The cool creaminess of the ice cream beautifully contrasts with the crunchy, chewy texture of the butterfinger caramel crunch bars, making each bite an absolute delight.
For an afternoon treat or after-dinner indulgence, a warm cup of coffee or a comforting mug of hot chocolate makes an excellent pairing. The slight bitterness of coffee helps to cut through the sweetness, while hot chocolate simply amplifies the cozy, comforting vibes. My mom always pairs her desserts with a strong cup of English breakfast tea.
If you’re looking for a lighter touch, a small bowl of fresh mixed berries—like raspberries and blueberries—adds a lovely tart counterpoint. Their natural sweetness and vibrant color provide a refreshing balance to the rich caramel and chocolate.
How to Store butterfinger caramel crunch bars
Keeping your butterfinger caramel crunch bars fresh and delicious is key to enjoying them for days to come! Proper storage ensures that delightful crunch and chewiness remain intact, just as they were when freshly made.
Refrigerator Storage
I always recommend storing these butterfinger caramel crunch bars in an airtight container in the refrigerator. This keeps the caramel firm and prevents the chocolate from getting too soft. They will stay wonderfully fresh for up to 5-7 days. Simply let them sit at room temperature for about 10-15 minutes before serving for the best texture.
Freezer Friendly
Yes, these bars freeze beautifully! Once completely set, cut the butterfinger caramel crunch bars into individual servings. Wrap each bar tightly in plastic wrap, then place them in an airtight freezer-safe container or bag. They’ll keep well in the freezer for up to 3 months. When you’re ready for a treat, thaw them in the refrigerator overnight or at room temperature for a couple of hours.
My personal tip? Before storing, I like to separate layers of bars with parchment paper in the container. This prevents them from sticking together, making it easy to grab just one whenever a craving strikes!
Nutritional Benefits
While butterfinger caramel crunch bars are certainly a decadent treat, they do offer some delightful elements to savor. The crushed Butterfinger candy bars contribute some energy-boosting carbohydrates, while the dairy from the butter and heavy cream provides essential fats that help with nutrient absorption and give a feeling of satiety. It’s a wonderful reminder that desserts can be both satisfying and a source of joy, crafted with simple ingredients to nourish our spirits as much as our bodies.
FAQs
Can I use a different type of candy bar?
Absolutely! While Butterfinger adds a unique crunch, you can easily substitute it with other crushed candy bars like Snickers, Heath bars, or even M&M’s for your butterfinger caramel crunch bars. Experiment to find your favorite flavor combination!
Do these bars need to be refrigerated?
Yes, for the best texture and to keep the caramel firm, I highly recommend storing your butterfinger caramel crunch bars in the refrigerator. This also helps the chocolate topping stay set and prevents them from getting too soft.
Can I make the caramel ahead of time?
You can! Prepare the caramel layer and let it cool completely. Store it in an airtight container in the refrigerator for up to 3 days. Gently reheat it over low heat, stirring frequently, before pouring it over your shortbread crust for your butterfinger caramel crunch bars.
How do I get clean cuts on the bars?
For neat, clean slices of your butterfinger caramel crunch bars, use a sharp knife that has been run under hot water and then wiped dry. Cut through the chilled bars with a single, firm motion. Reheat the knife as needed between cuts.
Conclusion
And there you have it, sweet friends—a recipe for butterfinger caramel crunch bars that I truly believe will bring a smile to your face and warmth to your kitchen. It’s more than just a dessert; it’s an invitation to create, to share, and to make those precious memories that linger long after the last crumb is gone. Remember, baking is a journey of love, patience, and a dash of magic. So, gather your ingredients, put on your favorite apron, and let’s fill our homes with the delightful aroma of homemade goodness. Happy baking!