
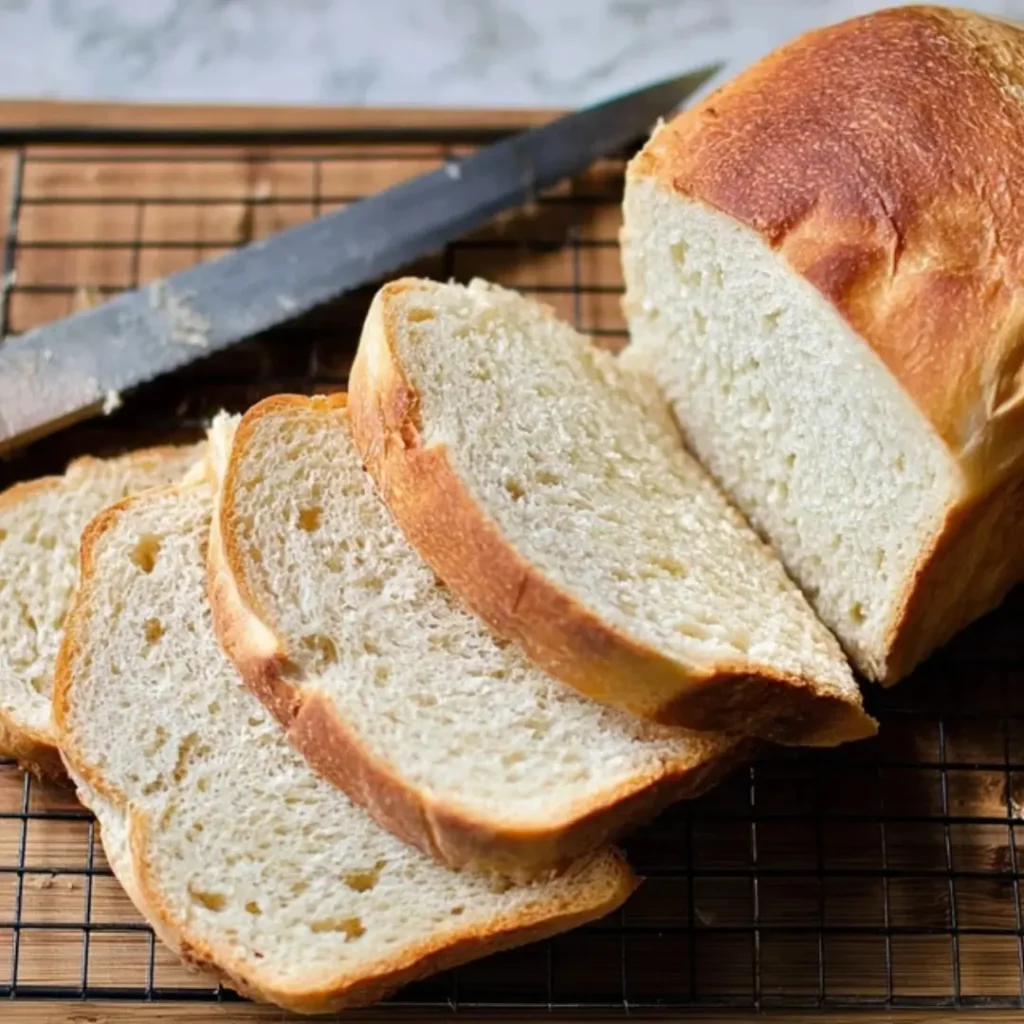
Oh, the aroma of freshly baked bread! There’s truly nothing quite like it, is there? Today, my dears, we’re diving into the heartwarming world of Bread – Sourdough Sandwich Bread. This isn’t just any loaf; it’s a soft, tender, and slightly tangy masterpiece that transforms everyday meals into something truly special. Imagine biting into a slice, still warm from the oven, with that perfect crust and incredibly fluffy interior. It’s pure baking magic, I tell you!
My fondest memories often involve the simple act of baking. I remember standing on a stool in Grandma’s kitchen, her hands dusted with flour as she kneaded dough. The scent of yeast and warmth filled the air, a comfort I’ve carried with me my whole life. Sharing a freshly baked treat was her way of showing love, and it’s a tradition I cherish.
This recipe for homemade sourdough sandwich bread brings together that same love and patience with a surprisingly achievable process. It’s perfect for elevating your lunch sandwiches and makes the most wonderful toast, bringing families together around the breakfast table. My top tip? Don’t rush the process; the dough will tell you what it needs!
What You Need to Make This Recipe
To craft this delightful sourdough sandwich bread, you’ll need just a few simple ingredients that truly shine. The star, of course, is your active sourdough starter, bringing that signature tang and incredible rise. We’ll also combine sturdy bread flour with a touch of whole wheat for beautiful texture and flavor, complemented by warm water, a hint of sugar, and rich unsalted butter. The full list with precise measurements awaits you in the recipe card below.
How to Make Bread – Sourdough Sandwich Bread
Creating this soft sourdough sandwich bread is a journey of patience and gentle handling, leading to the most rewarding results. We begin by waking up our sourdough starter and allowing the flours to autolyse, building strength before we introduce the salt, sugar, and butter. Then, through a series of gentle stretch and folds, we develop the dough’s structure, followed by thoughtful shaping, a final proof, and a perfect bake.

Classic Sourdough Sandwich Bread
Ingredients
Equipment
Method
- Ensure your sourdough starter is active and bubbly, fed 4-12 hours prior and at its peak (doubled in size). In a large mixing bowl, combine the warm water and active sourdough starter. Whisk until the starter is mostly dissolved.
- Add the bread flour and whole wheat flour to the bowl. Mix with your hands or a dough scraper until no dry spots remain and a shaggy dough forms. Cover the bowl with plastic wrap or a shower cap and let it rest for 30 minutes (autolyse). This allows the flour to fully hydrate.
- After the autolyse, sprinkle the salt and sugar over the dough. Add the softened butter cubes. Using wet hands, knead the dough in the bowl for 5-7 minutes until the salt, sugar, and butter are fully incorporated and the dough starts to feel smoother and more elastic.
- Cover the bowl again and let the dough rest for 30 minutes. Over the next 2-3 hours, perform 4 sets of stretch and folds, spaced 30 minutes apart. For each set, lightly wet your hands, grab a portion of the dough from one side, stretch it up, and fold it over the center. Rotate the bowl and repeat 3-4 times until all sides have been stretched and folded. Recover the dough after each set.
- After the final set of stretch and folds, allow the dough to continue bulk fermenting at room temperature (72-76°F / 22-24°C) until it has increased in volume by about 50-75% and feels light and airy. This can take anywhere from 3 to 7 hours depending on your starter’s strength and ambient temperature.
- Lightly flour your work surface. Gently turn the dough out onto the surface. Preshape the dough into a loose rectangle or round. Let it rest, uncovered, for 15-20 minutes to relax the gluten.
- Lightly grease a 9×5 inch loaf pan. To shape the loaf, gently flatten the dough into a rectangle. Fold the top third of the dough down to the center, pressing firmly. Fold the bottom third up and over the previous fold, creating a tighter rectangle. Then, starting from one short end, roll the dough tightly into a log. Pinch the seam closed. Place the shaped dough seam-side down into the prepared loaf pan.
- Cover the loaf pan with plastic wrap or a clean kitchen towel. Proof at room temperature for 2-4 hours, or until the dough has nearly doubled in size and feels very puffy. Alternatively, for a more developed flavor and easier handling, cold proof in the refrigerator for 8-16 hours.
- Preheat your oven to 400°F (200°C) with a rack in the center. If cold proofing, remove the dough from the fridge while the oven preheats.
- Bake for 40-50 minutes, or until the crust is deeply golden brown and the internal temperature reaches 200-210°F (93-99°C). If the crust is browning too quickly, you can loosely tent it with aluminum foil for the last 15-20 minutes.
- Once baked, immediately remove the loaf from the pan and transfer it to a wire rack to cool completely before slicing (at least 2-3 hours). Slicing hot bread can result in a gummy texture.
Notes
* **Hydration**: Adjust water slightly based on your flour’s absorption. The dough should be tacky but manageable.
* **Windowpane Test**: After adding the butter, sugar, and salt, the dough should pass the windowpane test (stretch a small piece thinly enough to see light through it without tearing).
* **Fermentation**: The bulk fermentation and final proof times are estimates. Rely more on the dough’s feel and appearance (puffiness, jiggle) than strict timing.
Pro Tips for Making This Bread – Sourdough Sandwich Bread
Baking, much like life, is full of little secrets and gentle nudges that make all the difference. When it comes to your Bread – Sourdough Sandwich Bread, I’ve picked up a few tricks over the years that I’m just delighted to share with you.
First, ensure your sourdough starter is truly active and bubbly before you begin. A strong starter is the backbone of a successful loaf, giving it that wonderful lift and distinctive flavor. I often feed mine 4-6 hours before I plan to use it and watch for those tell-tale bubbles and a noticeable rise.
Next, when performing your stretch and folds during bulk fermentation, be gentle. Think of it as encouraging the gluten to develop rather than forcing it. My grandmother always said, “Treat the dough like a baby, Sara,” and it’s a piece of advice I’ve always remembered.
My Secret Trick: I always use a kitchen scale for all my measurements. Bread baking, especially with sourdough, is a science, and precise measurements make a world of difference in consistency and outcome. It truly takes the guesswork out of it!
Finally, don’t underestimate the final proof. This is where your shaped loaf truly builds its airy texture. Look for the dough to be noticeably puffy and spring back slowly when gently poked. If it springs back too quickly, it needs more time; if it collapses, it’s over-proofed.
Fun Variations for Bread – Sourdough Sandwich Bread
One of the greatest joys of baking is the freedom to experiment and make a recipe truly your own! While this classic sourdough sandwich bread is perfect as is, a few simple additions can transform it into something new and exciting.

Savory Twists
For a delightful savory loaf, consider adding some grated sharp cheddar cheese and a sprinkle of chopped fresh chives or dill to the dough during the second stretch and fold. My friend Emily always asks me to add rosemary and a touch of garlic powder to her loaf – it’s heavenly with soup!
Seeded Sensation
If you adore texture, mix in a handful of your favorite seeds, such as sesame, poppy, or sunflower, with the flours. You can also sprinkle them on top before baking for a beautiful crust. This adds a lovely crunch and a boost of nutrients to your sourdough sandwich bread.
A Touch of Sweetness
While this is a savory bread, a hint of sweetness can be delightful. A tablespoon or two of honey or maple syrup added with the warm water can subtly enhance the flavor and create an even softer crumb, perfect for morning toast.
What to Serve With Bread – Sourdough Sandwich Bread
This homemade sourdough sandwich bread is so wonderfully versatile, it’s a dream to pair with almost anything! Its tender crumb and subtle tang make it the perfect companion for countless meals and snacks.
For me, there’s nothing quite like a thick slice of this sourdough sandwich bread toasted until golden brown, then slathered with homemade berry jam and a generous dollop of cream cheese. It instantly transports me back to lazy Sunday mornings. My mom always insisted it made the best grilled cheese sandwiches, and I have to agree—the crust crisps up beautifully, and the interior stays soft.
It also makes an incredible base for hearty sandwiches, piled high with your favorite deli meats, crisp lettuce, and fresh tomatoes. Don’t forget about dipping! A warm slice alongside a bowl of cozy soup or a vibrant pasta dish is pure comfort. For a quick serving idea, brush slices with garlic butter and toast them under the broiler for instant garlic bread!
How to Store Bread – Sourdough Sandwich Bread
You’ve put so much love into baking your sourdough sandwich bread, and I want to make sure it stays fresh and delicious for as long as possible! Proper storage is key to preserving that wonderful texture and flavor.
Countertop Storage
For enjoying your loaf within 2-3 days, store it at room temperature. Once completely cooled, I like to place my sourdough sandwich bread in a breathable bread bag or wrap it snugly in a clean linen towel. Avoid airtight plastic bags for long-term counter storage, as they can trap moisture and make the crust soggy.
Freezing for Freshness
If you want to keep your bread longer, the freezer is your best friend! Slice the cooled loaf completely, then arrange the slices on a baking sheet and freeze until firm. Once frozen, transfer the slices to a freezer-safe bag or container. This way, you can grab just a few slices as needed. When ready to enjoy, simply toast directly from the freezer, and your sourdough sandwich bread will taste almost as fresh as the day you baked it!
Nutritional Benefits
Beyond its delightful taste, this homemade sourdough sandwich bread offers wonderful goodness! Thanks to the whole wheat flour, it provides a healthy dose of fiber, which is fantastic for digestion. Sourdough fermentation can also make nutrients more bioavailable and the bread easier to digest for some. It’s a treat that’s both satisfying and nourishing, showing how simple, wholesome ingredients can truly shine in your kitchen.
FAQs
Faq 1
How do I know my sourdough starter is active enough?
Your starter is ready when it has roughly doubled in size after feeding, has many visible bubbles on the surface and sides, and passes the float test (a small spoonful floats in water). An active starter ensures a good rise for your sourdough sandwich bread.
Faq 2
Can I use all-purpose flour instead of bread flour?
While you technically can, bread flour has a higher protein content, which is crucial for developing strong gluten and achieving that lovely chewiness in sourdough sandwich bread. Using all-purpose flour might result in a slightly softer, less structured loaf.
Faq 3
Why is my sourdough sandwich bread dense?
A dense loaf can be due to several factors: an inactive starter, under-proofing (not enough time for the dough to rise), or over-handling the dough, which can deflate the air pockets. Patience and gentle technique are key to a light and airy sourdough sandwich bread.
Faq 4
How long does homemade sourdough sandwich bread last?
Properly stored at room temperature, your homemade sourdough sandwich bread will stay fresh for about 2-3 days. If you slice and freeze it, it can last for several months, ready for you to toast and enjoy whenever a craving strikes!

Conclusion
Baking your own Bread – Sourdough Sandwich Bread is more than just making a loaf; it’s an act of love, a journey of discovery, and a delicious way to bring warmth and joy into your home. The satisfaction of pulling a golden, fragrant loaf from your oven is truly unparalleled. I hope this recipe inspires you to embrace the process, trust your instincts, and create sweet, comforting memories in your own kitchen. Happy baking, my dears!